RZ/V2H Evaluation Board Kit
Overview
The RZ/V2H high-end AI MPU boasts Renesas’ proprietary dynamically reconfigurable processor AI accelerator (DRP-AI3), quad Arm Cortex-A55 (1.8GHz) Linux processors, and dual Cortex-R8 (800MHz) real-time processors. Furthermore, the RZ/V2H also includes another dynamically reconfigurable processor (DRP). This processor can accelerate image processing, such as OpenCV, and dynamics calculations required for robotics applications. It also features high-speed interfaces like PCIe, USB 3.2, and Gigabit Ethernet, making it an ideal microprocessor for applications such as autonomous robots and machine vision in factory automation, where advanced AI processing must be implemented with low power consumption.
RZ/V2H Secure Evaluation Board (CPU Board)
PMIC: RAA215300
Clock generator: 5L35023B
Main memory: LPDDR4X 8GB x 2
xSPI Flash memory: 64MB
External memory: Micro SD x 2
High-speed interface:
Gigabit Ethernet x 2 ports
USB 3.2 Gen2 x 2ch (Host only)
USB 2.0 x 2ch (On-the-Go (OTG) x 1ch, Host x 1ch)
PCIe Gen3 x 1ch (4 lanes max)
MIPI CSI-2 x 4ch
MIPI DSI x 1ch
GPIO: 86 pins
RZ/V2H-EVK Expansion Board (EXP Board):
HDMI Tx x 1
Audio AUX connector x 1ch
Audio MIC connector x 1ch
Audio HP connector x 1ch
Pmod x 4
Hardware
The Renesas RZ/V2H documentation can be found at RZ/V2H Group Website [5]
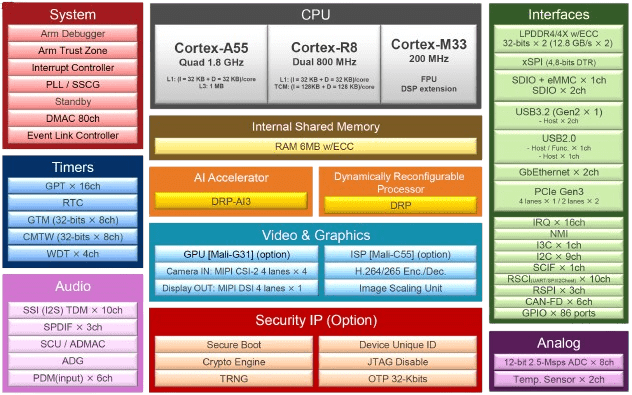
RZ/V2H block diagram (Credit: Renesas Electronics Corporation)
Detailed hardware features for the board can be found at RZV2H-EVK Website [4]
Supported Features
The rzv2h_evk board supports the hardware features listed below.
- on-chip / on-board
- Feature integrated in the SoC / present on the board.
- 2 / 2
-
Number of instances that are enabled / disabled.
Click on the label to see the first instance of this feature in the board/SoC DTS files. -
vnd,foo -
Compatible string for the Devicetree binding matching the feature.
Click on the link to view the binding documentation.
rzv2h_evk/r9a09g057h44gbg/cm33 target
On-target memory for this board target: 1032191 B of RAM, N/A of Flash.
Type |
Location |
Description |
Compatible |
|---|---|---|---|
CPU |
on-chip |
ARM Cortex-M33 CPU1 |
|
ADC |
on-chip |
Renesas RZ ADC-E driver1 |
|
Counter |
on-chip |
Renesas RZ GTM Counter8 |
|
DMA |
on-chip |
RZ DMA controller5 |
|
GPIO & Headers |
on-chip |
Renesas RZ GPIO common1 |
|
on-chip |
|||
I2C |
on-chip |
||
Interrupt controller |
on-chip |
ARMv8-M NVIC (Nested Vectored Interrupt Controller)1 |
|
on-chip |
Renesas RZ Interrupt Controller1 |
||
on-chip |
Renesas RZ GPIO interrupt (TINT) controller32 |
||
LED |
on-board |
Group of GPIO-controlled LEDs1 |
|
Miscellaneous |
on-chip |
||
MMU / MPU |
on-chip |
ARMv8-M MPU (Memory Protection Unit)1 |
|
Pin control |
on-chip |
Renesas RZ/V pin controller1 |
|
PWM |
on-chip |
Renesas RZ GPT PWM16 |
|
Serial controller |
on-chip |
||
SPI |
on-chip |
RENESAS RZ SPI B3 |
|
SRAM |
on-board |
Generic on-chip SRAM2 |
|
Timer |
on-chip |
ARMv8-M System Tick1 |
|
on-chip |
Renesas RZ GPT16 |
||
on-chip |
Renesas RZ GTM Timer8 |
rzv2h_evk/r9a09g057h44gbg/cr8_0 target
On-target memory for this board target: 512 KiB of RAM, N/A of Flash.
Type |
Location |
Description |
Compatible |
|---|---|---|---|
CPU |
on-chip |
ARM Cortex-R8 CPU1 |
|
ADC |
on-chip |
Renesas RZ ADC-E driver1 |
|
Counter |
on-chip |
Renesas RZ GTM Counter8 |
|
GPIO & Headers |
on-chip |
Renesas RZ GPIO common1 |
|
on-chip |
|||
I2C |
on-chip |
||
Interrupt controller |
on-chip |
ARM Generic Interrupt Controller v11 |
|
on-chip |
Renesas RZ Interrupt Controller1 |
||
on-chip |
Renesas RZ GPIO interrupt (TINT) controller32 |
||
LED |
on-board |
Group of GPIO-controlled LEDs1 |
|
Miscellaneous |
on-chip |
||
Pin control |
on-chip |
Renesas RZ/V pin controller1 |
|
PWM |
on-chip |
Renesas RZ GPT PWM16 |
|
Serial controller |
on-chip |
||
Timer |
on-chip |
per-core ARM architected timer1 |
|
on-chip |
Renesas RZ GPT16 |
||
on-chip |
Renesas RZ GTM Timer8 |
Connections and IOs
By default, the board is configured for use with:
SCI_UART
SCI_UART0:
TX = Pmod 3A pin 2
RX = Pmod 3A pin 3
LED
LED5 (yelow) = P0_0
LED6 (yelow) = P0_1
Programming and Debugging (M33/R8)
The rzv2h_evk board supports the runners and associated west commands listed below.
| flash | debug | rtt | attach | reset | debugserver | |
|---|---|---|---|---|---|---|
| jlink | ✅ (default) | ✅ (default) | ✅ | ✅ | ✅ | ✅ |
Applications for the rzv2h_evk board can be built in the usual way as
documented in Building an Application.
Console
The UART port for Cortex-M33/Cortex-R8 System Core can be accessed by connecting Pmod USBUART
to the upper side of PMOD Type 3A.
Debugging
It is possible to load and execute a Zephyr application binary on
this board on the Cortex-M33/Cortex-R8 System Core from
the internal SRAM, using JLink debugger (J-Link Debug Host Tools).
Here is an example for building and debugging with the Hello World application.
CM33:
# From the root of the zephyr repository
west build -b rzv2h_evk/r9a09g057h44gbg/cm33 samples/hello_world
west debug
CR8:
# From the root of the zephyr repository
west build -b rzv2h_evk/r9a09g057h44gbg/cr8_0 samples/hello_world
west debug
Flashing
RZ/V2H-EVK is designed to start different systems on different cores. It uses Yocto as the build system to build Linux system and boot loaders to run Zephyr on Cortex-M33/Cortex-R8 with u-boot. The minimal steps are described below.
Download Multi-OS Package from the RZ/V2H Easy Download Guide [1]
Unzip Multi-OS Package then open “r01qs0077ej****-rzv2h-multi-os-pkg” PDF file.
Follow “3.2 Integration of Multi-OS Package related stuff” to build RZ/V2H AI SDK Source Code. Uncomment the following lines in meta-rz-features/meta-rz-multi-os/meta-rzv2h/conf/layer.conf.
#MACHINE_FEATURES_append = " RZV2H_CM33_BOOT"
MACHINE_FEATURES_append = " SRAM_REGION_ACCESS"
#MACHINE_FEATURES_append = " CM33_FIRMWARE_LOAD"
#MACHINE_FEATURES_append = " CA55_CPU_CLOCKUP"
The below necessary artifacts will be located in the build/tmp/deploy/image
Artifacts |
File name |
|---|---|
Boot loader |
bl2_bp_spi-rzv2h-evk-ver1.srec fip-rzv2h-evk-ver1.srec |
Flash Writer |
Flash_Writer_SCIF_RZV2H_DEV_INTERNAL_MEMORY.mot |
SD card image |
core-image-weston-rzv2h-evk-ver1.wic.bmap core-image-weston-rzv2h-evk-ver1.wic.gz |
Carry out 1-9 of Step “1-B Write the Linux files to SD card” at Step 7 Deploy AI Application [2] to prepare SD card.
Run the following commands to write zephyr.bin to SD card.
$ sudo mkdir /mnt/sd -p
$ sudo mount /dev/sdb2 /mnt/sd
$ sudo cp /path/to/zephyr.bin /mnt/sd/boot
$ sync
$ sudo umount /mnt/sd
Warning
Change /dev/sdb to your microSD card device name. Use dh -h to check.
Insert the SD card into SD1 of RZ/V2H EVK, set up board at eSD mode (DSW1[4:5] = ON, OFF).
Turn on the board carefully, see “3.2.2.4 Power Supply” in Getting Started with Flexible Software Package [3] Then, you should see the following message on the console associated with CN12 of RZ/V2H EVK.
U-Boot 2021.10 (Jun 14 2024 - 18:14:19 +0000)
CPU: Renesas Electronics CPU rev 1.0
Model: Renesas EVK Version 1 based on r9a09g057h4
DRAM: 15.9 GiB
MMC: mmc@15c00000: 0, mmc@15c10000: 1(snip)
Net: eth0: ethernet@15c30000, eth1: ethernet@15c40000
Hit any key to stop autoboot: 3
Hit any key within 3 sec to stop autoboot.
Carry out the following setup of u-boot to kick CM33/CR8 Core.
CM33:
=> setenv cm33start 'dcache off
=> mw.l 0x10420D2C 0x02000000
=> mw.l 0x1043080c 0x08003000
=> mw.l 0x10430810 0x18003000
=> mw.l 0x10420604 0x00040004
=> mw.l 0x10420C1C 0x00003100
=> mw.l 0x10420C0C 0x00000001
=> mw.l 0x10420904 0x00380008
=> mw.l 0x10420904 0x00380038
=> ext4load mmc 0:2 0x08003000 boot/zephyr.bin
=> mw.l 0x10420C0C 0x00000000
=> dcache on'
=> saveenv
=> run cm33start
CR8:
=> setenv cr8start 'dcache off
=> mw.l 0x10420D24 0x04000000
=> mw.l 0x10420600 0xE000E000
=> mw.l 0x10420604 0x00030003
=> mw.l 0x10420908 0x1FFF0000
=> mw.l 0x10420C44 0x003F0000
=> mw.l 0x10420C14 0x00000000
=> mw.l 0x10420908 0x10001000
=> mw.l 0x10420C48 0x00000020
=> mw.l 0x10420908 0x1FFF1FFF
=> mw.l 0x10420C48 0x00000000
=> ext4load mmc 0:2 0x12040000 boot/zephyr.bin
=> mw.l 0x10420C14 0x00000003
=> dcache on'
=> saveenv
=> run cr8start